- Brush
- Vacuum
- Wipe
Cleaning Smoke Detectors: A Complete Step-by-Step Guide
Cleaning smoke detectors takes minutes with cupboard-only steps for dust, pet hair, and grease, plus checks for damage, batteries, and replacement.

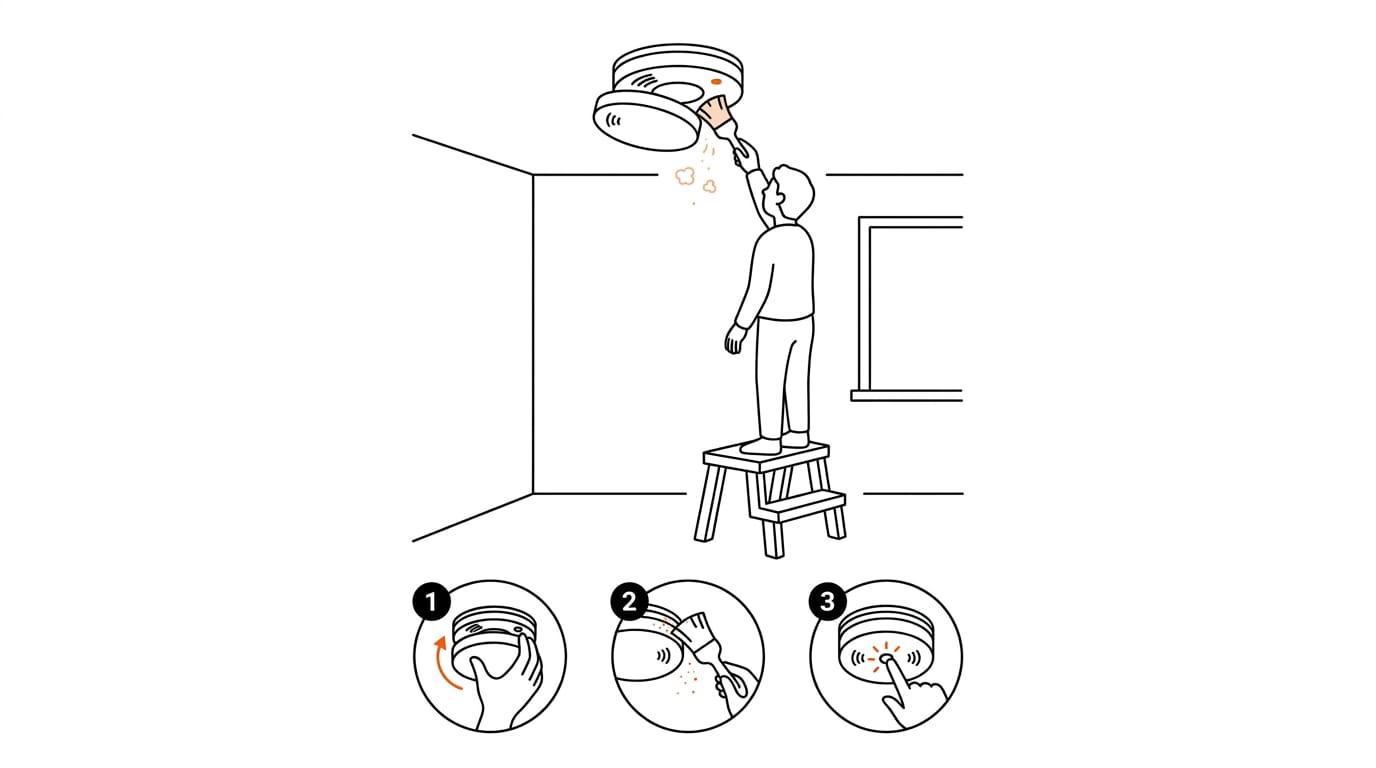
Cleaning a smoke detector means gently removing dust, pet hair, and grease from its exterior and vents without opening the unit. Vacuum or brush the vents, use compressed air if needed, wipe with a barely damp cloth, then let it dry and test the alarm; avoid sprays, solvents, excess moisture, and poking the vents. Clean monthly, check for damage and blockages, and replace the battery or alarm when it chirps, fails a test, or reaches the end of its service life, because cleaning cannot fix a faulty unit.
Picture this: you’re standing in the hallway, staring up at the smoke alarm, wondering when it was last cleaned and whether that faint layer of dust on the cover matters. You’re in the right place.
Keeping a smoke detector clean is a simple job, but a few details make all the difference.
This guide covers how to clean your alarm, how often to do it, what to avoid, and when cleaning simply won’t fix the problem. You’ll also find fast, cupboard-only steps for dust, pet hair, and kitchen grease, so you can sort it in minutes.
Testing Smoke Alarms and Cleaning Smoke Detectors
Cleaning only helps if the alarm still works afterward, so testing is the final step. Here’s how to do it, how often to repeat it, and what each type should show you.
Use the test button the right way
Find the test button and press and hold it, rather than giving it a quick tap. Wear ear protection first, since the sound is very loud indoors. The test sequence varies by model, so check the manual if the pattern surprises you.
If there’s no sound at all, replace the battery first.
Think of a tenant who has just wiped dust off the alarm in a rented flat. A single press and hold shows whether the cleaning left it working, so they can refit the cover with confidence. Test first, then trust it.
How often to test alarms
Build testing into a simple routine:
- Weekly: a quick home test is the easiest habit to keep.
- Monthly: a home test once a month works if weekly feels like too much.
- Annually: an annual functional test confirms the whole alarm works together.
- Sensitivity: sensitivity testing runs on its own schedule, separate from the routine checks.
How each alarm type responds to testing
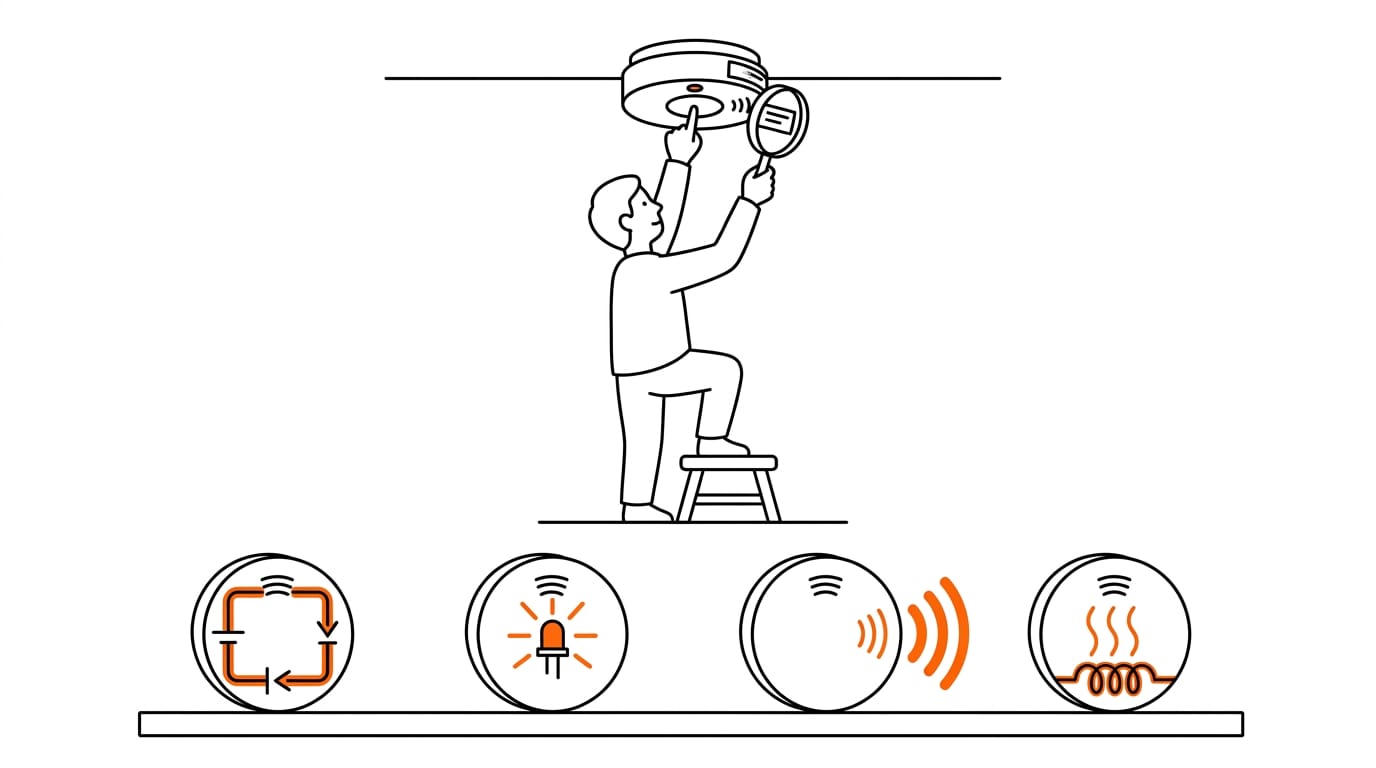
Each type responds differently, so check which one you have before you test:
- Ionization alarms: the test confirms the electrical circuit is working as it should.
- Photoelectric alarms: the test checks the brightness of the built-in light-emitting diode (LED).
- Carbon monoxide (CO) and gas alarms: the test confirms the alarm sends its electrical signal.
- Heat alarms: the test checks that the heating element responds as it should.
Safe ways to test without real smoke
Use canned smoke, which is artificial smoke made for testing, rather than real smoke. Never use real smoke or flames on an alarm, since it’s risky and you don’t need it.
A magnet test is insufficient on its own, because waving a magnet near the alarm doesn’t prove the sensor responds. For a proper check, run a functional test with artificial smoke and confirm the alarm sounds.
Methods and Timing for Cleaning
Most of this job takes minutes and never requires opening the unit. Here’s the method, the timing, and what to keep away from it.
Clean the alarm without opening it
You don’t need to take the cover off. It’s less about opening the unit and more about keeping the vents clear. Work in this order so loose dust isn’t pushed deeper:
- Brush the exterior with a soft brush vacuum attachment.
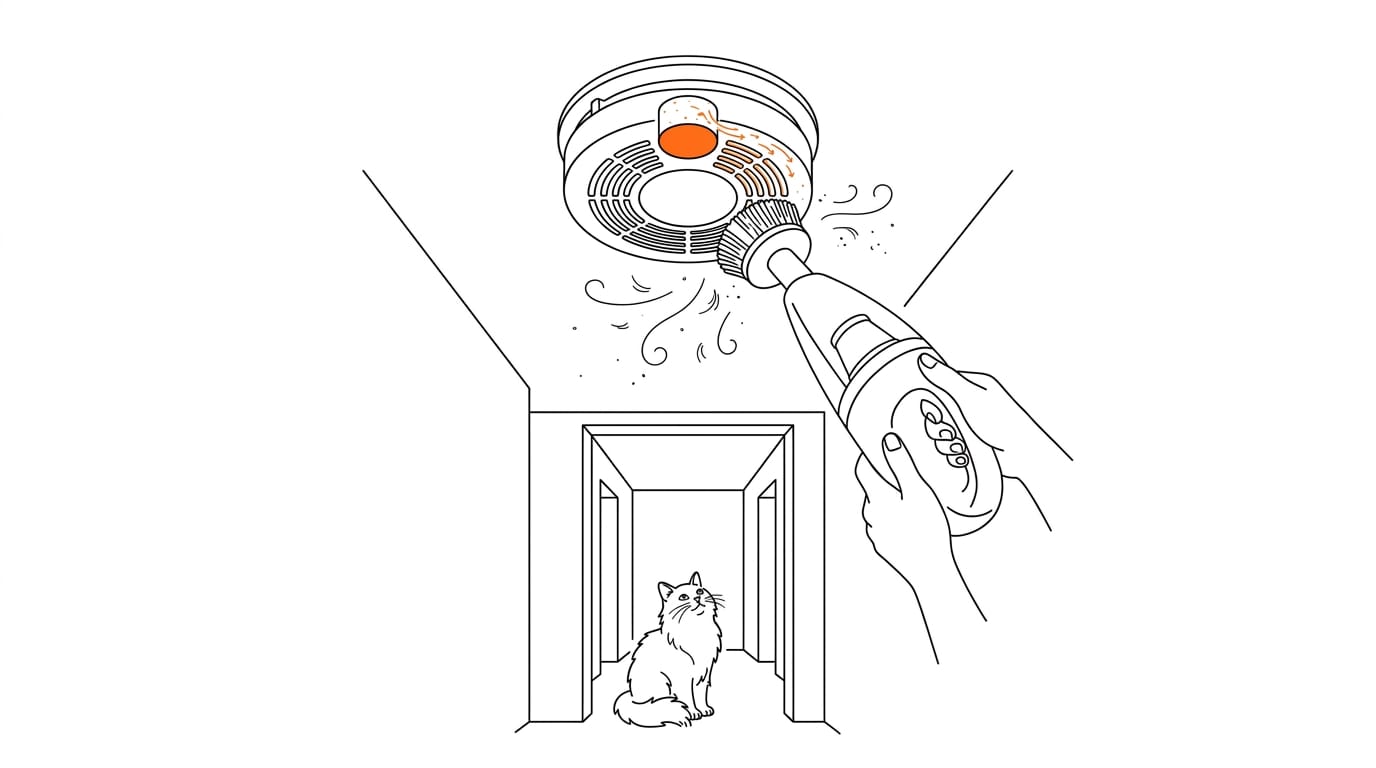
- Vacuum the side vents with a household vacuum brush attachment.
- Blow out what’s left with a can of compressed air or a hair dryer.
- Wipe the exterior with a damp cloth, then let it dry completely.
Kitchen grease on the outside? Soaps and solvents are out, so a damp cloth is as far as you go. If it won’t lift, skip the sprays and check the manufacturer instructions.
Removing a Kidde detector from the ceiling depends on the model, so check the manufacturer instructions for yours first.
When to clean your alarm
Monthly cleaning is the recommended routine, so tie it to a job you already do each month. Clean more often as conditions require, such as a busy kitchen or a home with pets. Always follow the manufacturer instructions, since they come first.
What to avoid when cleaning
Gentle and dry beats strong and wet. Keep these off the list:
- No soaps or solvents.
- Excess moisture damages the unit, so keep your cloth barely damp.
- No air compressor machines. Stick to the can of compressed air from step three.
- Don’t paint the enclosure.
- Skip sprays and other cleaning products.
Why cleaning matters
Dust and pet hair settle on the vents, and that’s where the trouble starts. Regular cleaning lets smoke reach the sensing chamber, the part that picks up smoke. It also:
- Helps avoid false or nuisance alarms.
- Removes dust and pet hair before it builds up.
Think of a pet owner whose cat sheds across the hallway. A monthly pass with the soft brush attachment keeps the hair out of the vents. Keep it clear.
If your alarm keeps beeping after smoke has cleared, check the manufacturer instructions for how to silence and reset it. Keeping the vents clear helps, since dust can set off false alarms.
Checking Alarms for Damage and Blockages
Before you clean, give the alarm a quick once-over. Most problems are visible.
Visual checks for damage and dirt
Start with the outside. Look for physical damage such as:
- cracks,
- dents, or
- a cover that no longer sits flat.
Then check for dirt or obstruction: dust or a greasy film around the vents can keep smoke from reaching the sensing chamber, the part that detects it.
Make this a semiannual inspection, twice a year. Most of the time you’re dealing with a dusty detector rather than a broken one, and that’s good news.
Consider a tenant who finds grey pet hair caught around the hallway alarm. A dry soft brush from the cupboard clears it in under a minute, with no call to the landlord.
To check if a smoke detector is bad, look for visible cracks, a unit that sits loose, or one that doesn’t sound when you press its test button. Replace it rather than cleaning it. Quick check. Big payoff.
Common things that block alarms
Most blockages are things left behind or placed too close, so they’re quick to fix once you spot them:
- Orange shipping cap. New units can arrive with an orange plastic cap still in place. Pull it off before you use the alarm, or it can’t do its job.
- Tape over the vents. Tape left over from packing or decorating can block the sensing chamber. Peel it off gently.
- Furniture or curtains blocking. A sofa, shelf, or curtain pushed up against the unit cuts off airflow. Keep a clear space around it.
- Avoid accidental damage. Take care with ladders and bumped furniture, and use a soft brush rather than poking the vents with a pin.
Batteries and When to Replace Alarms
Chirps and age are the two things that usually tell you an alarm needs attention, so start with those.
Yearly battery changes and low-battery alerts
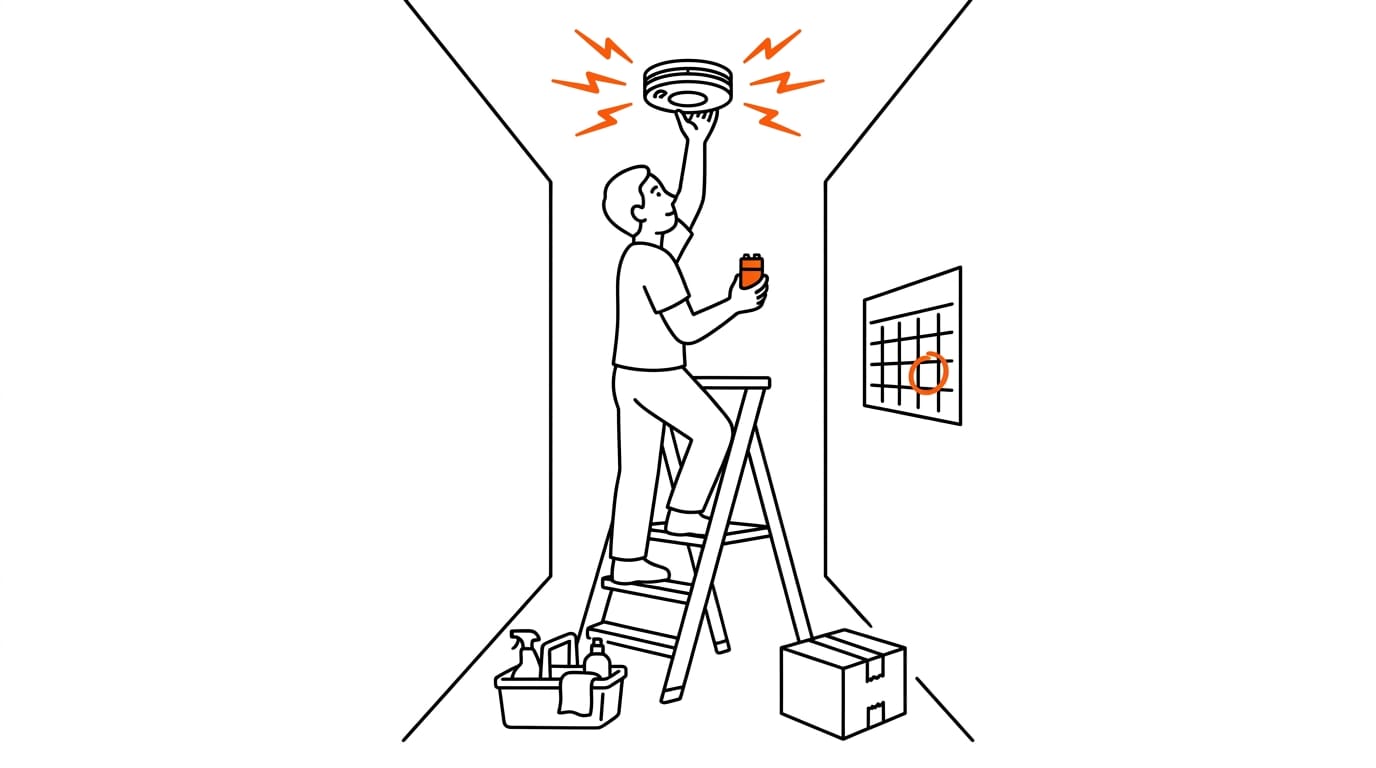
Replace batteries once a year, even if the alarm has been quiet. When you hear the low-battery signal, swap the battery straight away rather than waiting for it to get worse.
Hardwired alarms, the ones wired into your home’s electrics, also have a backup battery, so replace that at the same time.
Consider a cleaner on a rental changeover who hears a chirp from the hallway ceiling. A spare battery in the kit sorts it in two minutes, and the next tenant never has to wonder about that noise.
How do I stop sealed alarms chirping?
Some alarms have a battery that’s sealed inside, so you can’t swap it at all. To get it to quit chirping, first see whether the battery comes out.
If it’s sealed in and still chirping, that’s usually an end-of-life chirp, a warning that the alarm itself is worn out. A new battery won’t help. The fix is replacing the whole alarm, not repairing it.
When to swap out the whole alarm
According to the State Fire Marshal, smoke alarms should be replaced every 7 to 10 years, and any alarm that’s more than 10 years old, or has no date, should be replaced right away.
Follow the manufacturer’s instructions for your model, since they’re written for that exact unit. If the test button doesn’t set off the alarm, replace the whole unit, whatever its age. A failed test is the clearest sign of all.
Rules, Duties, and Keeping Records
Before you reach for the cloth, it helps to know who’s responsible and what paperwork to keep.
How alarms differ from detectors
A standalone alarm is self-contained: the sensor and sounder sit in one unit, and it works on its own. A detector is different. It connects to a control panel, and the panel raises the alarm for the whole system.
Where each one is required depends on the rules for your building, so check those before you install or replace anything.
Who is responsible for upkeep
The property owner is ultimately responsible for upkeep, even when someone else handles the day-to-day checks. If you live in the home, you may be able to carry out inspection, testing and maintenance (ITM) on a standalone alarm yourself.
Systems wired to a panel are a different job and need a qualified person, not a quick wipe from the occupant. Landlords also carry legal duties for alarms in rented homes, so if you’re a tenant, ask your landlord what’s been arranged and who’s doing it.
Keep maintenance records for one year
Keep a simple log of every inspection, test and clean. According to a guide to inspection record retention from Forz, ITM records for smoke alarm systems should be kept for one year. Note it, date it, keep it.
Think of a tenant who dusts a standalone alarm, then texts the landlord the date. That one message gives you a record if anyone asks later.
A smoke detector is only useful if it’s working, and that comes down to a few habits: testing it, cleaning it gently and regularly, checking for damage or blockages, and keeping an eye on the batteries.
Knowing when cleaning won’t fix the problem matters just as much.
With a few cupboard basics and a few minutes, you can beat dust, pet hair, and kitchen grease. Keep it simple, keep it regular, and your alarm will be ready when you need it most.
References
- State Fire Marshal, Fire Chiefs Raise Awareness of Expired Smoke Alarms — mass.gov (2025)
- How Long to Keep NFPA 25 and NFPA 72 Inspection Records — forz.io (2026)
Questions
What are the NFPA smoke detector sensitivity testing requirements?
NFPA 72 generally requires smoke detector sensitivity testing within one year after installation and every other year after that. The interval may be extended to five years when records show that sensitivity has remained stable; follow the edition adopted locally and the manufacturer’s instructions.
How do you clean a smoke detector with compressed air?
Turn off power to a hardwired alarm first, then brush or vacuum dust from the exterior and vents. Use a can of compressed air in short bursts, following its label and keeping the nozzle at a safe distance; do not use an air compressor or open the detector. Wipe the outside with a barely damp cloth, let it dry completely, and test the alarm.
How do I get my smoke detector to quit chirping?
Replace a removable battery, including the backup battery in a hardwired alarm, and press the test button afterward. If the battery is sealed and the chirping continues, it may be an end-of-life warning, so replace the alarm. Check the model’s instructions if the chirp persists.
How to remove kidde smoke detector?
Kidde alarms attach in different ways, so check the instructions for your exact model before removing it. For a hardwired unit, switch off the circuit, twist or release the alarm from its mounting plate as directed, and disconnect the wiring plug; remove any battery if the instructions call for it.
How to check if a smoke detector is bad?
Look for cracks, dents, a loose cover, or blocked vents, then press and hold the test button. If it does not sound after you replace the battery, or it continues to signal a fault, replace the alarm. Alarms older than 10 years or with no date should also be replaced.
How to stop a smoke detector from beeping after smoke?
Once the smoke has cleared, follow the manufacturer’s instructions to silence and reset the alarm; many models have a hush or silence button. If it keeps beeping, clean the vents and check the battery. Do not disable the alarm, and replace it if the problem continues or it is at end of life.
Do smoke detectors eventually go bad?
Yes. Smoke alarms wear out over time and should generally be replaced every 7 to 10 years, following the manufacturer’s instructions. Replace one sooner if it fails its test or gives an end-of-life warning.
Can smoke detectors be cleaned?
Yes. Clean the alarm about once a month, or more often if dust, pets, or kitchen grease make it necessary. Brush and vacuum the exterior vents, use canned compressed air if needed, and avoid liquids, solvents, sprays, and opening the unit.
Sources
More in Floors & Carpets
- Isopropyl Alcohol for Cleaning: A Complete GuideIsopropyl alcohol for cleaning can lift ink, grease, and sticky labels. Choose the right strength and protect upholstery and surfaces it can damage.
- Cleaning Plastic Step by Step, with Pantry StaplesCleaning plastic tackles food stains, smells, cloudy clear plastics, and safe disinfection with cupboard ingredients, plus when to replace old containers.
- How Does an Ultrasonic Cleaner Work? A Complete GuideHow does an ultrasonic cleaner work? See how tiny bubbles loosen grime, which solutions and settings suit different jobs, and where cleaning falls short.
Stain Finder: a free stain removal guide
Find your stain